
The bead suddenly turns black and grey. Penetration drops. The sparks go from a steady, fine stream to something noisy and uneven. If you’re like most operators, the first thought is the expensive one: the laser source is dying.
Nine times out of ten, it isn’t. The source is fine. What moved is the focus position — and that’s the cheapest repair in laser welding. No parts, no technician, no downtime. Two minutes of test shots on a scrap coupon.
Focus matters more than almost any other setting, because it’s the one thing that changes power density without changing the number on the panel. Same power, same speed — a focus that’s a few millimetres off turns a clean weld into an open flame or a cold, black bead.
This is the field method we use on every machine we ship and every service call we answer: how to find the focus in about five minutes, using nothing but your eyes and your ears. By the end you’ll have a five-step calibration you can repeat on any job, plus a triage table for the times focus isn’t the problem.
We’ll start with the factory setting, then the 300W test, then the two signals — the red dot and the spark — and finish by putting the wire back in to verify the melt.
The Factory "0" Is a Starting Point, Not a Guarantee
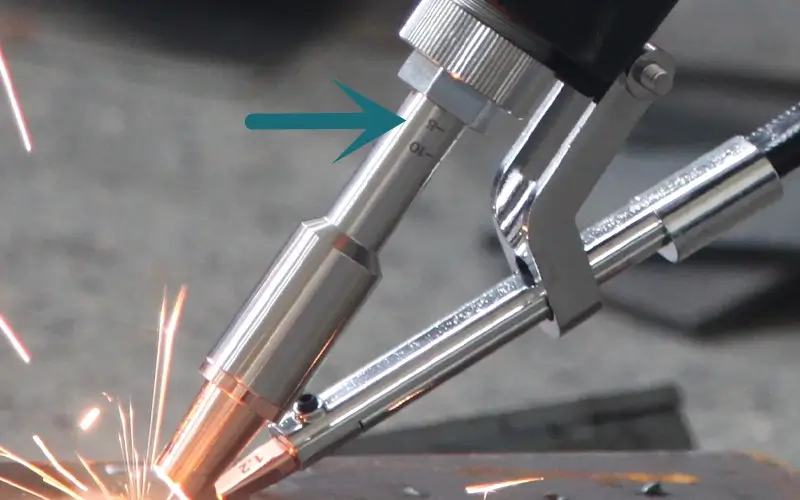
Every handheld laser welder we build ships with the focus set to scale position 0. On a brand-new machine, that’s the correct starting point — which is why we mark it there, and why it works out of the box.
The problem is that the relationship drifts. After months of service, the true focal position can move, and the red guide beam can shift out of line with where the laser actually lands. Neither failure shows up on the panel. The machine just starts welding worse, a little at a time.
The usual causes are easy to list: a changed torch head or protective lens, a nozzle knocked against the workpiece, moving the machine between jobs, lens contamination, or simply a hard daily duty cycle. Any of them can push the focus off the mark.
The rule of thumb is simple: if the bead changes character while your settings didn’t, recalibrate the focus before you touch anything else.
Before You Start: Power Down to 300W
Focus testing is done at low power, and there’s a reason. Full power burns through the coupon on contact, and the hole it leaves tells you nothing. You need to read the front of the weld, not vaporize it.
Set the power field on the panel to 300W. Type in an actual 300 watts — not a percentage, and the same figure whether you’re running a 1500W, 2000W or 3000W unit. It’s the test setting we use across the whole range.
Then prepare a scrap coupon of the same material and thickness as production. Don’t grab a random offcut of a different alloy or thickness — the focus you find on the wrong test piece won’t transfer to the real job.
Three safety points, no exceptions: rated laser eyewear on, the workpiece secured, and bystanders clear. Laser welding safety is a habit, not a setting. Last, confirm the red guide beam is on and steady — you’re about to use it as a measuring tool.
Signal 1 — The Red Dot: Is the Beam Centred and Round?
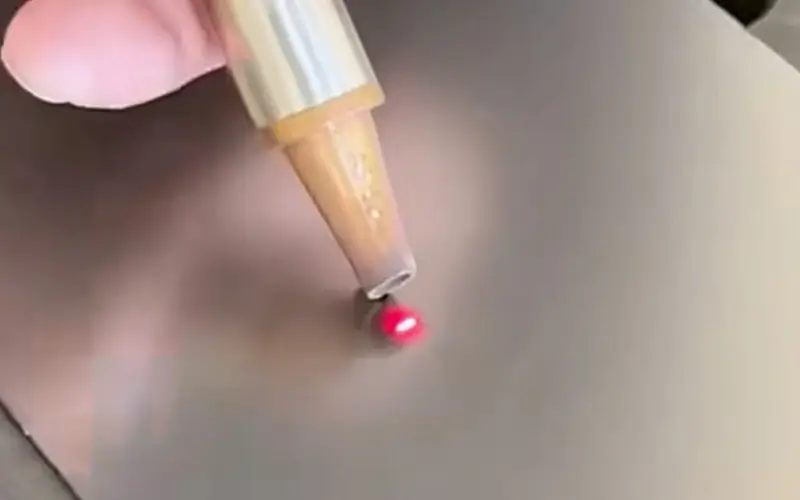
Before you judge the focus, judge the aim. Fire a single test shot on the coupon and look at the mark it leaves — the mark, not the red light itself. The mark tells you where the beam actually landed and how big the spot really was.
Read it with three questions. Is the mark centred under the nozzle? Is it round, or is it oval or comet-shaped with a tail? And is it the smallest spot the machine can make at that distance?
A centred, round, minimal mark is what you want. An off-centre or comet-shaped mark usually means the optics are misaligned or a lens is contaminated — that’s maintenance, not a knob you turn. Don’t try to correct it by chasing the focus.
Keep the coupon. You’ll fire a second shot after you adjust and compare the two. Date the coupon and keep a few around, and you’ve started building a service history for the machine.
Signal 2 — Sparks, Sound and Bead Colour: Finding the Focus
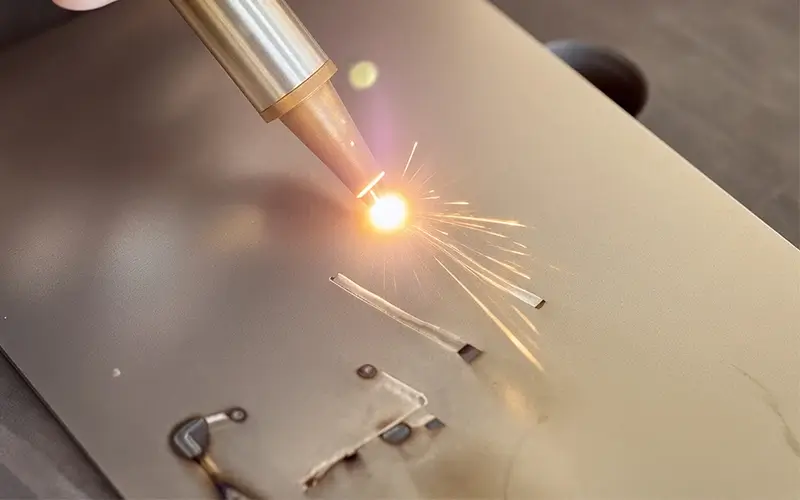
This is the part where your ears do as much work as your eyes.
Rest the scale tube against the workpiece surface to lock your standoff, then pull the trigger and watch the front end. Three things have to line up at once, and together they tell you where the focus is.
- No open flame. An open flame at the front means the focus is too close — the energy is being dumped into a spot that’s already past the focal point.
- Even, fine sparks and a crisp, clean sound. A dull hiss with weak, scattered sparks means you’re too far out — the power density has dropped.
- A bright white bead. The right focus produces a clean, bright white weld. Grey or black means the energy isn’t landing where it should.
Here’s the move that makes the difference. With the tube resting on the workpiece, pull the torch slowly back — increasing the distance from the nozzle to the work — and watch the front as you go. The open flame will stop, the sparks will settle into an even stream, the sound will turn crisp, and the bead will come out bright white. That alignment is your focus.
Once it’s lined up, lock the locking nut so the setting survives the next weld. Then write the scale number down for that material and thickness. Next time you’ll set it in five seconds, not five minutes.
Here’s the full picture at a glance:
| What you see and hear | What it means | What to do |
|---|---|---|
| Open flame, spitting sparks | Focus too close | Pull the torch back slowly |
| Dull hiss, weak sparks, grey or black bead | Focus too far (or low power, or low gas) | Move in closer, then check the triage table |
| Even fine sparks, crisp sound, bright white bead | Focus correct | Lock the nut |
| Off-centre or comet-shaped mark | Beam misalignment or dirty lens | Stop and go to maintenance — don’t chase focus |
The Last Check: Put the Wire Back In and Verify the Melt
With the focus locked, you’re almost done — but the setting isn’t proven until the filler runs through it. A focus that looks right on a bare plate can still be wrong once wire is in the mix. Load the wire and run it again. The wire should enter the pool and melt smoothly — no spitting, no slapping against the workpiece, no sticky un-melted stub left behind.
If the wire stubs or sprays, re-check the focus before you touch the wire-feed settings. Focus is the cheaper variable to move, and it’s usually the one that actually drifted.
Only once the wire runs clean do you move to a real joint. When you do, check the bead the way you’d check any weld — if you’re unsure what a good one looks like, how to judge laser weld quality walks through it. And if your aluminum work is the one giving you trouble, the usual culprit is the wire-feed path rather than the focus.
It's Not Always the Focus: A Triage Table
Set the focus and the weld still isn’t right? Then focus isn’t the problem. It’s the first thing to check because it’s free — but it isn’t the answer to everything. The same symptoms can come from gas flow, lens condition or power settings, and chasing the wrong knob wastes the morning.
| Symptom | Focus a likely cause? | Other things to check |
|---|---|---|
| Black or grey bead | Possible | Gas flow too low, clogged nozzle, dirty lens |
| Weak or uneven penetration | Possible | Power setting, travel speed, dirty or oily surface |
| Heavy spatter and fume | Possible | Focus too close, gas flow, surface contamination |
| Off-centre mark | No — stop adjusting focus | Beam misalignment, loose red-light mount, dirty lens → maintenance |
| Odd sound but normal bead | No | Gas line, loose torch head |
Know when to stop and call for support: an off-centre beam that survives adjustment, visible lens damage, coolant or alarm faults, or a bead that changes character in the middle of a single pass. Focus fixes a lot. It doesn’t fix everything, and pretending it does costs you parts.
FAQ
The bead changes character while your settings don’t — it turns grey or black, penetration drops, or the sparks turn noisy. That’s your signal to recalibrate.
Because full power burns through the coupon and destroys the evidence. At 300W you can read the flame, the sparks and the bead colour — the three signals that tell you where the focus actually is.
“0” is the correct starting point on a new machine. But the true focal position drifts with lens changes, bumps and daily use, so “0” is a starting point, not a permanent guarantee.
Usually the focus is too far out and the power density has dropped — but low gas flow, a clogged nozzle or a dirty protective lens produce the same symptom. Check focus first, then the triage table.
On a trigger, not a calendar: after a torch-head or lens change, after the nozzle gets knocked, after moving the machine, or the moment the bead changes character.
Yes. That’s the whole point of this method — a 300W test shot, your eyes and your ears, and about five minutes. No instruments, no service call.
Focus is the cheapest repair in laser welding. Two minutes of test shots on a scrap coupon, no parts, no technician, no downtime — and it fixes the majority of “my machine is dying” complaints before they ever become a service ticket.
Set it to 300W, rest the scale tube on the workpiece, pull the torch back until the flame stops and the sparks run even, and lock the nut. Do that the moment the bead changes character, and the machine welds like the day you unboxed it.
Send us a ten-second clip of your test shot and the material you weld, and we’ll read it with you and tell you the scale value we’d start from. It’s the same thing our service team does on every call — a pair of trained eyes on your exact machine.
Kindly contact us for a support.