
How to Use the Laser Cleaning Mode on 3-in-1 Laser Welder
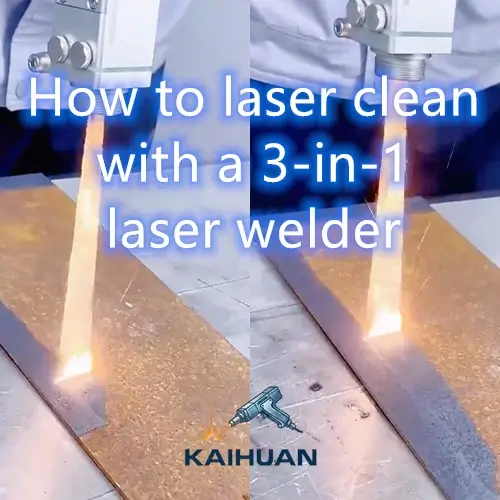
The cleaning mode on a 3-in-1 laser welder removes rust, mill scale, paint, and weld residue. No abrasives, no chemicals, no second machine. Same fiber laser source you already weld with, just switched into a wide, low-heat beam that strips surface contamination instead of fusing metal.
Here’s the full workflow: what to remove first, how to set power and width, how to trigger the beam, and how to judge the result. Written from the operator’s bench, not a spec sheet.
Safety First. Read This Before You Start
The cleaning beam is still a laser. The same rules apply as when you weld.
- Wear OD6+ laser goggles rated for 1064 nm. A cleaning beam reflecting off bright metal can damage eyes just as fast as a weld beam.
- Keep bystanders out of the beam path and the reflection zone.
- Run fume extraction if you are removing paint or galvanized coating. The vaporized material is not air.
- Never look into the red guide light or the cleaning beam.
Step 1: Remove the Interference Parts
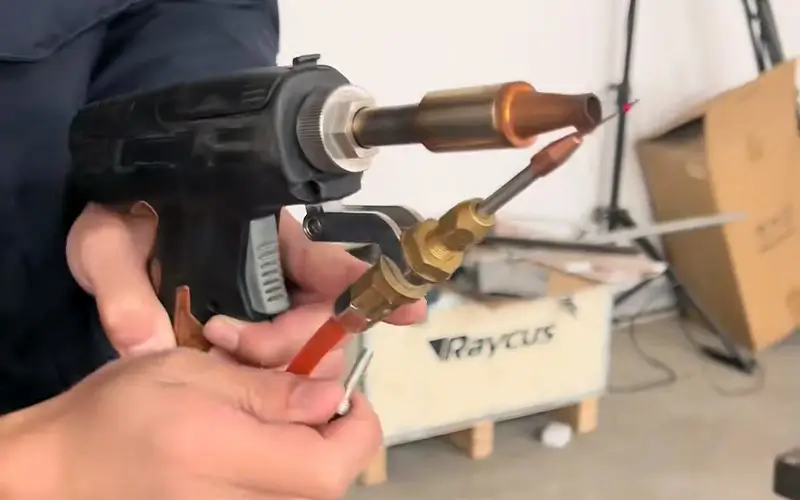
First, strip the parts that sit in the path of the wider beam. On most Kaihuan torches, that’s:
- the wire feed tube
- the focal scale tube
- the copper nozzle
- the locking nut
Don’t miss the locking ring on the focal scale tube. Leave it on and it chokes the cleaning width.
Torch models differ a bit, but the sequence is the same. If a part would block the beam, it comes off.
Step 2: Switch to Cleaning Mode and Set Power to Maximum
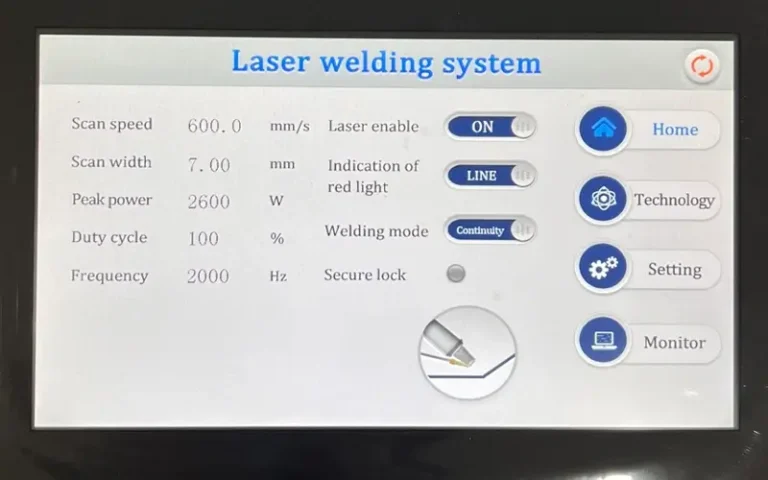
Start by switching the machine out of weld mode. Tap the mode switch button in the top-right corner of the touch screen, then follow the on-screen prompt to restart the machine. Once it restarts, you’re in cleaning mode.
Cleaning wants power, not penetration. Crank the laser to maximum. 1500W on the KH-1500. The beam needs enough energy density to vaporize contamination in one pass.
It won’t cut or melt the base metal at these settings, because the beam is spread wide. That’s Step 3. High power plus wide beam means cleaning. High power plus narrow beam means cutting. Don’t mix those up.
Step 3: Adjust the Scanning Width
Use the red guide light to position the torch and set the width. Width goes up to 30 mm.
Here’s the setting most first-timers get wrong: the wider the scan, the more the energy spreads out, and the more the beam defocuses. Cleaning power drops as width climbs.
Heavy rust or thick mill scale? Run a narrower width for more energy density. Light haze on a big panel? Open the width up and trade intensity for coverage.
Step 4: Double-Press the Trigger
Fair warning: this trips up nearly everyone on the first try. Cleaning mode starts with a double press of the trigger. A single press does nothing.
One press is the weld signal. The double press is an extra step on purpose, so you never fire a cleaning beam when you meant to weld.
Step 5: Control the Distance
Distance controls energy density directly. Get the torch closer and the energy climbs. Cleaning gets more aggressive. Back off and it weakens.
On unfamiliar material, start far and move in. Watch the surface, not the settings. The metal tells you when you’re close enough.
Step 6: Judge the Result
Don’t guess. Compare before and after on the same piece.
- Brightness. Cleaned metal is visibly brighter than the area around it.
- Residue. Rust, scale, or paint should be gone, not smeared.
- Base metal. Clean, not etched or melted. See melting? You’re too close, or the width is too narrow.
Still weak? Narrow the width or move in before you touch the power.
Why Wider Is Not Better
This runs against intuition, so it’s worth getting straight. A 30 mm scan spreads the same 1500W over more area. Each square millimeter gets less energy. The beam also defocuses at the edges, which cuts intensity further.
Cleaning is an energy-density game, not a coverage game. Max out the density first, then cover area by moving the torch. Not by widening the beam.
Getting More Done, Faster
Two levers speed this up.
- More power. A 2000W or 3000W machine cleans the same surface faster, at the same width.
- A dedicated cleaning head. If cleaning is a daily, high-volume job, a purpose-built cleaning torch gives a wider usable scan range and higher throughput than the 3-in-1 head.
Straight answer: the 3-in-1 cleaning mode is solid for job-shop surface prep and light-to-medium rust. Running a dedicated, continuous derusting line? A specialized laser cleaning system is the stronger tool. For everyone else, the 3-in-1 gets it done without adding a second machine to the floor.
Frequently Asked Questions
Not if the power and distance are set correctly. The wide, defocused beam strips surface contamination without melting the metal underneath. See melting? Move farther away or narrow the scan.
It separates the two beams. One press fires the weld beam. The double press is an extra step on purpose, so you never fire the cleaning beam when you meant to weld.
30 mm on the standard Kaihuan 3-in-1 head. Remember, the widest setting has the lowest energy density. Use it for light haze, not heavy rust.
Yes, but aluminum reflects more laser energy than steel. Start at lower power density and watch the surface closely. The same care you take when welding aluminum applies here.
Ready to Put the Cleaning Mode to Work?
The KH-1500 runs the full weld-clean-cut workflow off a single-phase wall outlet. If your shop still grinds rust and mill scale by hand, the cleaning mode replaces that labor with a laser pass.